How to chat on gmail ? - Google has added voice calling functionality within the Hangouts chat module in Gmail.  This function was previously removed from Google Chat within Gmail.  The full rollout will take place within.
If you want to make a call from Hangouts, find the new phone icon in Gmail or the “Call a phone” menu item within Google+ and the Chrome extension.  You can add multiple phone numbers and video participants to the same call and play sound effects like Applause and Laughter using the Google Effects app too.

Video chatting on Gmail just got a little better thanks to a little update of the video chat app by Google. Today, Google announced that it was bringing its Google+ Hangouts video chatting services to users in Gmail. With the new Hangouts in Gmail, you will be able to chat with others like you normally did. But now, you will have additional features, such as the ability to video chat with up to 9 people at a time, the ability to share your screen, or watch YouTube videos with the others you’re hanging out with, and much more.

Google+ Hangouts on Gmail is going to start rolling out to users starting today and will continue for the coming weeks. This move right here by Google is another sign that the search and advertising giant is serious about its social network. With time, Google+ will only continue to get better and we’re looking forward to the future updates. 
How to add contacts to gmail ? - If you're wondering how to add friends, neighbors, family, or business associates to your Google contacts list, this article is just for you: it will show you just how to do it, quickly and easily!
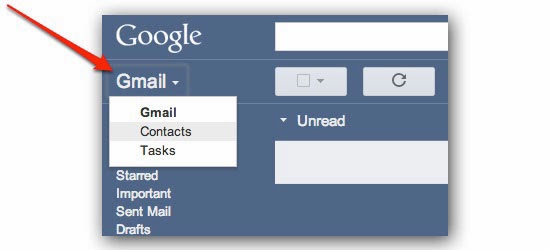
Steps 01: Open your Contacts list. At the top left of your Gmail page, locate the Gmail menu button, and click on it.
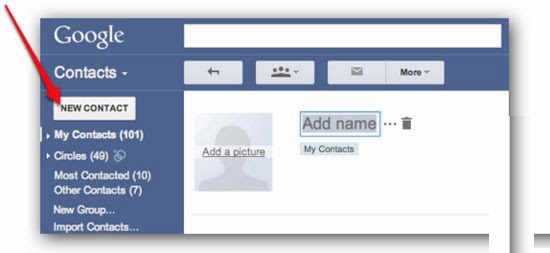
Steps 02: Click the New Contact button. It's located below the Contacts menu button.
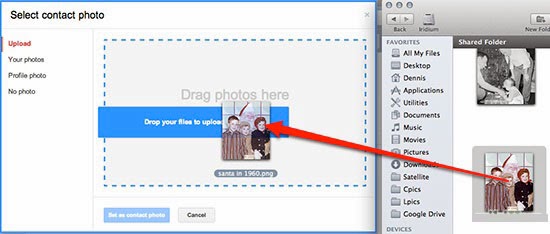
Steps 03: Add a photo. Click on "Add a picture," then drag a photo from your images into the photo frame.
The photo will upload.

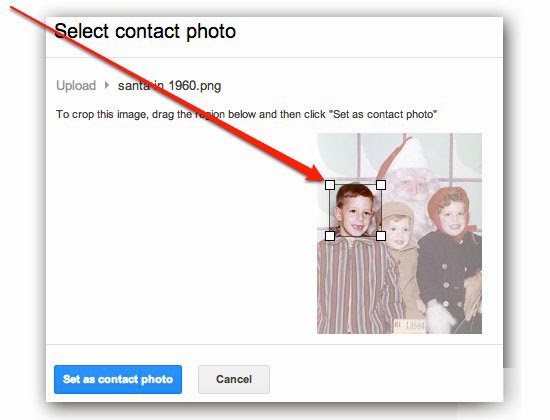
Steps 04: Crop the photo. Use the crop handles to adjust how much of your image to show. When you're done cropping, click the blue "Set as contact photo" button.
Your contact's image will be trimmed and placed as their profile image.

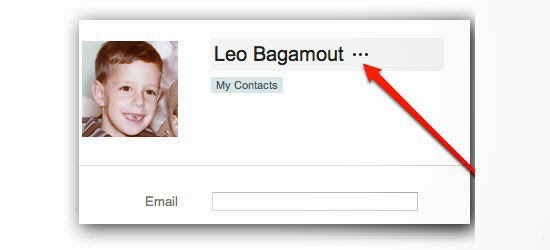
Steps 05: Fill in their name. Enter their name, and if you want to add further info such as Prefix, Middle Name, or Suffix, click the ellipses to the right of the name.
Note: you can edit this at any time.

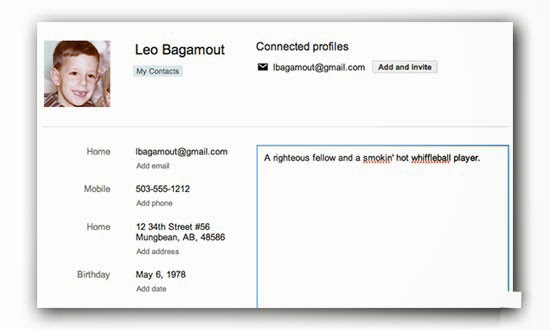
Steps 06: Fill in the balance. Add addresses, dates, and other info, as desired.
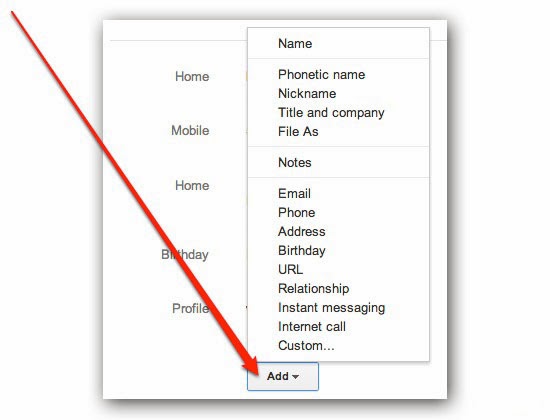
Steps 07: Add additional info. If you need additional fields, such as another address, or email, phone number, etc., click the Add button at the bottom.
All entered information is saved automatically.

Good luck! - gmailuserguide.blogspot.com
Forward yahoo mail to gmail - If for any reason you have to forward your Yahoo e-mail  to gmail, you have to  make a slight change to your Yahoo mail settings. It may seem complicated. but it's actually very easy to do!  This  step-by-step  guide will "walk"  you through the process. Requires Yahoo! Plus (paid version of Yahoo!).
Steps 01: Open Yahoo mail mail.yahoo.com

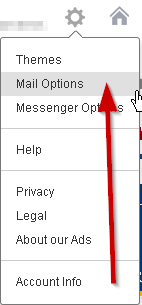
Steps 02: Click on the Settings icon to get a pull-down menu.

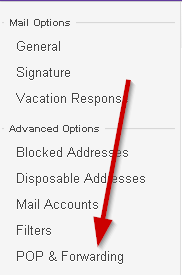
Steps 03: Find  an option called  "POP & Forwarding"  and click on it.

Steps 04: Do the following once you are in the box:    
  • Tick the box "forward... mail to another e-mail address".     
  • Enter the  gmail e-mail you want to forward to.  (example shown on image)     
  • Make sure to have "forward only" words in the bottom window (see image).
Steps 05: Save your settings.

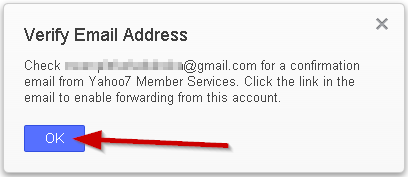
Steps 06: You will be asked to verify your gmail  address . To do so, open your gmail mail  and click on the link  provided by Yahoo.

Steps 07: From  this time one every email sent  to your Yahoo account will be automatically  forwarded to gmail.

Good luck! - gmailuserguide.blogspot.com
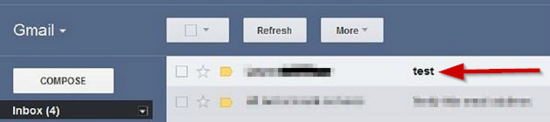
Block sender in gmail - Block sender gmail - While you can't currently block messages from specific addresses or domains in Gmail, you can set up filters to send those unwanted messages directly to the Trash, never to be seen. Follow these easy steps to banish all unwanted mail.
 
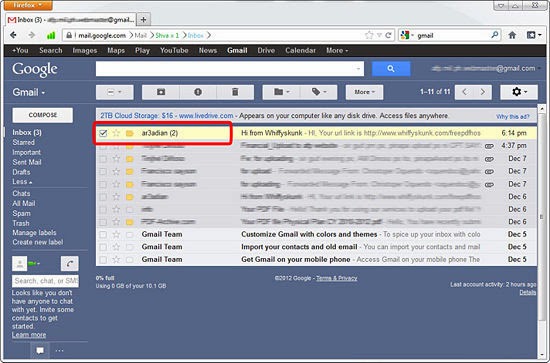
Steps 01: Open Gmail. Determine which sender you no longer wish to receive messages from.
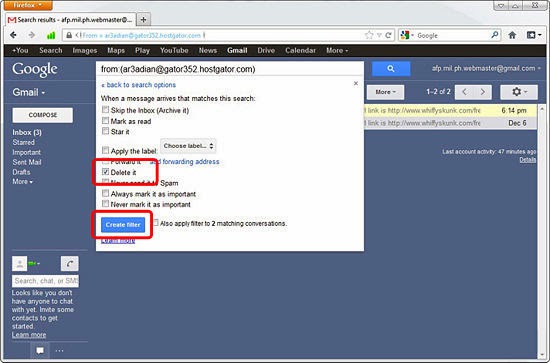
Steps 02: Click the triangle on the right-hand side of the search bar at the top of the screen. A window will appear. Ensure “All mail” is selected in the Search drop-down at the top left of the window.

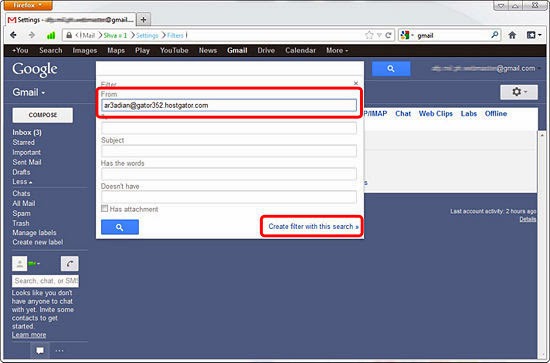
Steps 03: Enter in the criteria for your search. In the From space, type in the email address of the sender you’d like to filter.
To be sure the search worked properly, click the blue search button at the bottom left of the window. Re-click the down arrow in the search bar to return to the search window. 

Steps 04: Click the “Create filter with this search” hyperlink at the bottom right of the search window. A new window will appear containing a number of possible actions to be applied to your search criteria.

Steps 05: Select “Delete it” by clicking the checkbox to the right. All messages received from this sender will automatically be sent to the Trash.

Good luck! - gmailuserguide.blogspot.com
Backup gmail account - A lot of information sent over email these days can be very important, such as account and password information, bank statements, university grades, business reports, and general correspondence among friends and family. It's always possible, though, that any data you store on the Internet could get wiped out. On February 28, 2011, Google confirmed that many Gmail users had temporarily lost access to their emails.[1] If you're worried about ever losing your emails to a similar glitch, it's probably a good idea to regularly backup your Gmail account. By configuring an email client on your computer, you can download your emails onto your hard drive by following these steps.
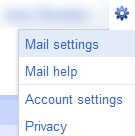
Steps 01: Log into Gmail and click on "Mail Settings" in the top right hand corner. This can be accessed from any Gmail page.
Log into Gmail and click on "Mail Settings" in the top right hand corner.
 
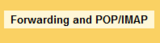
Steps 02: Locate and click on the "Forwarding and POP/IMAP" tab.
Locate and click on the "Forwarding and POP/IMAP" tab.

Steps 03: Look under "POP Download". Select the first option, "Enable POP for all mail (even mail that's already been downloaded)".
 

Steps 04: Click on "Save Changes" at the bottom.

Steps 05: Configure your mail client following the steps below. Once your mail client is configured to download your email, remember to open it periodically to backup.

Good luck! - gmailuserguide.blogspot.com
Gmail priority inbox - Priority Inbox is a new feature in Gmail that finds the messages of importance and sorts them for you, to prevent email overload. It does this by basing the importance on the emails you read and reply to. Here is how to start using it in your Gmail account.
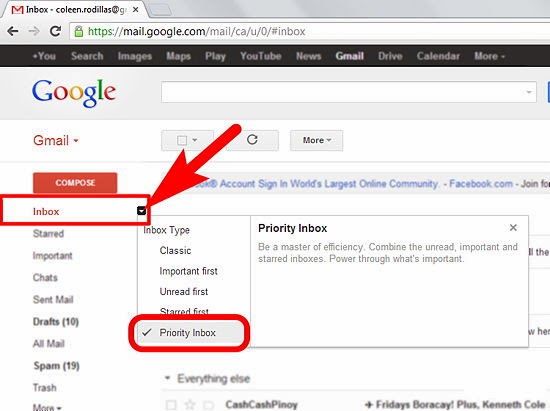
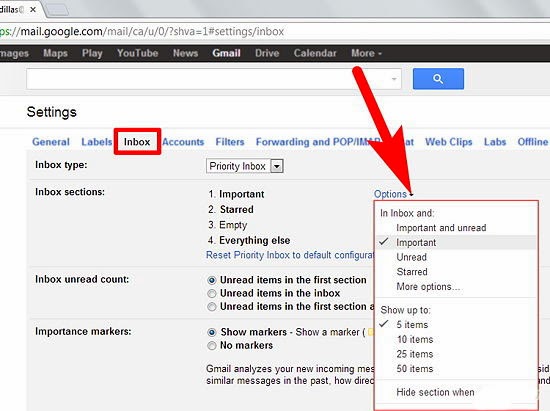
Steps 01: Hover your cursor over Inbox in the menu found on the left side of your Gmail screen. Click on the side arrow and select Priority Inbox.

Steps 02: Wait while Gmail activates Priority Inbox. This shouldn't take long.
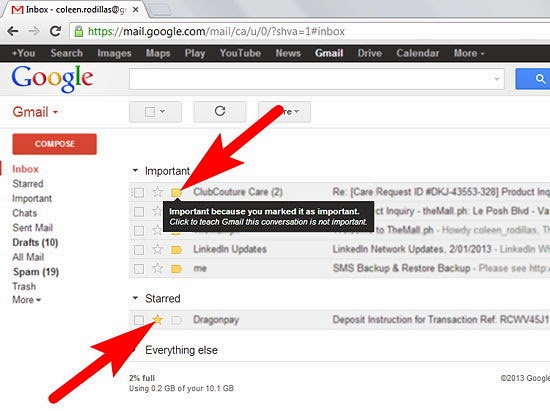
  • You will now see that your inbox looks a little different: 
  1. Important and unread are now listed first.
  2. Starred items are now brought into line as the next priority.
  3. All other emails are listed after the starred emails.
  • If you don't want to see the actual emails, you can collapse each set of headers using the tiny black arrows located in each header. The end result will appear very neat.
Steps 03: Train your Priority Inbox. You can rectify mistakes Gmail makes in highlighting or demoting the importance of your emails by pressing the tabs and stars at the start of each email line that represent increasing or lowering the email's importance. In this way the Priority Inbox quickly learns your preferences.
Steps 04: Customize the Priority Inbox. You can customize the Priority Inbox as follows:
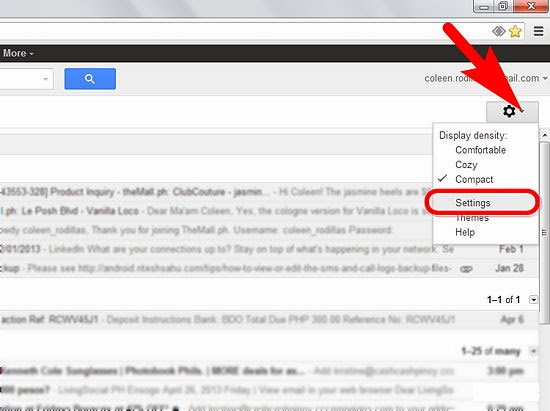
Click on the headers, or go to "Settings". A drop-down menu will appear allowing you to add or change a number of things, including labels, importance status, number of emails shown, hiding when empty, removal of the section and other options.

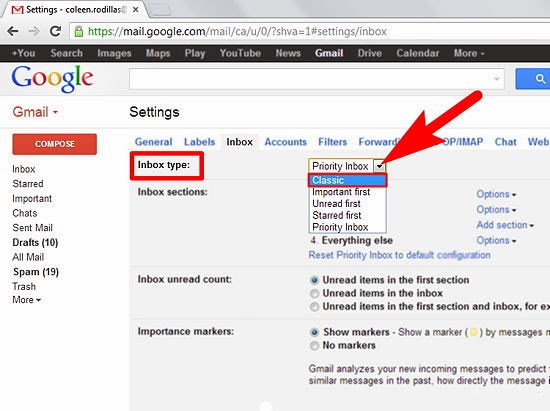
Steps 05: Change back to the ways things used to be. If you discover that you don't like using Priority Inbox, simply change it back. Do this by selecting the old inbox type in Settings.
Good luck! - gmailuserguide.blogspot.com
Gmail canned response setup - If you need to send similar email responses out to a number of people, consider using a Google Lab feature called "Canned Responses." This feature allows you to save an email as a canned response and use it over and over again without needing to copy and paste into a new window.
Steps 01: Enable Canned Responses
  1. Click on the gear icon in the upper right corner of your Gmail.
  2. Go to "Settings."
  3. Click on the "Labs" tab.
  4. Go to "Search for a lab," and type Canned Responses in the search bar.
  5. Press the button for "Enable."
  6. Press "Save Changes."
     

Steps 02: Create a Canned Response
  1. Click on "Compose." This button is near the top of the left-hand bar in your Gmail window.
  2. Create a response. To do this, either write the email you want to have as a canned response or copy and paste from a previous thread.
  3. Under the Subject heading of the email, click "Canned responses" in blue text.
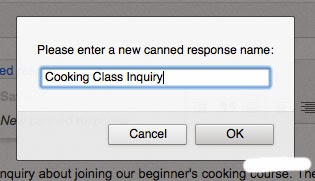
  4. Click "New canned response." It will be under the "Save" heading in the drop-down menu.
  5. Name your response. Call it something that will help you remember when to use your canned response, such as "email invitation" or "thank you for coming."
Steps 02: Use a Canned Response
  1. Click on "Compose." This button is near the top of the left-hand bar in your Gmail window.
  2. Click on "Canned responses."
  3. Click on the name of the response you'd like to use. Your saved responses are located under the "Insert" heading.
  4. Change any information in the canned response that needs to be modified.
  5. Send your canned response out.
Good luck! - gmailuserguide.blogspot.com
How to create a yahoo account ? A variety of email accounts can be handy. It's great to keep a personal email that you only give to friends, a business email that you only give to associates, a "trusted provider" email that you give to companies you trust not to sell your name, and the risky list—when you're just not sure who you're giving your name to. To manage these, it's important to have an email provider you trust.

Yahoo! is one of the Web's most reliable and long-standing email providers, and it's no wonder— it's free, it's fast, and it's easy to set up in a jiffy. Enjoy the efficiency of corresponding in style and security with your new Yahoo! Mail account.
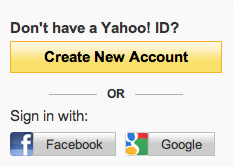
Steps 01: Go to Yahoo.com. In the top right is a Mail link. Click that to begin the email signup process, or click Yahoo! Mail.

Steps 02: Click on the Create New Account button. It's that ginormous yellow button near the top right of the Yahoo! home page, next to the even-more-ginormous ad.
 
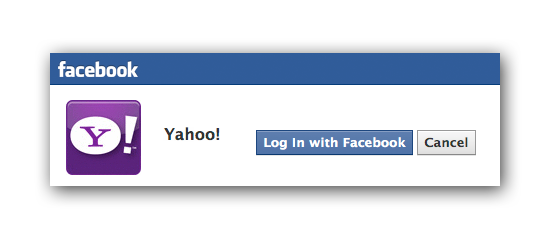
Steps 03: Choose your login. You can also choose to sign in with your Facebook or Google account. Instead of clicking Create New Account, click the Facebook or Google login buttons to create a Yahoo! email address. Once you've linked your Facebook or Google username and allowed the connection, you will fill out the rest of the Yahoo! Mail signup form.
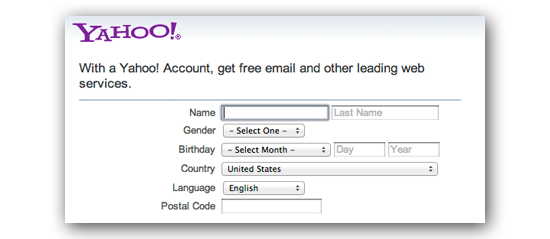
Steps 04: Enter your basic info. Fill in your name, gender, birthday, country, language, and postal code in the appropriate fields.
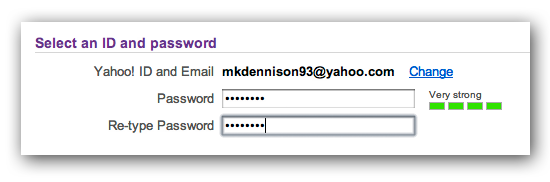
Steps 05: Create a Yahoo! ID and password. Make it one that you will be comfortable using for a long time, as this will identify you to your email recipients. Remember that you can use numbers and letters and even a single dot. 
  • Type the Yahoo! ID of your choice in the field provided, and then select one of 3 domains: yahoo.com, ymail.com, and rockemail.com. Verify the availability of your username/domain combination by clicking the Check button to the right.You may have to think of an alternative username if your top choice is already taken by another Yahoo! user.
  • Choose a password when you have successfully entered a unique username. Passwords must be at least 6 characters long and keep in mind that passwords are case-sensitive. You will be asked to type your password twice to ensure accuracy.
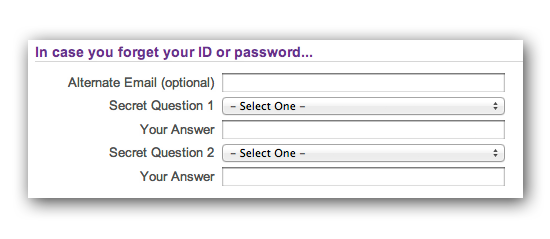
Steps 06: Add secure mental backup. In case you forget your login or password (yes, it happens), enter an alternate email address, and pick 2 secret questions from the pop-down menus.
  • After you've selected your questions, enter the correct answer—one that you are not likely to forget. Yahoo! will ask you this question if you should forget your password in the future, in order to verify that you are the correct user.
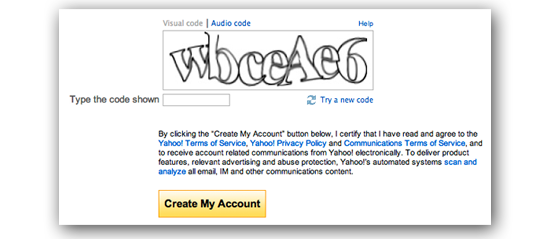
Steps 07: Verify you are not a robot. Enter the visual code that only humans (with warped glasses) can read. Type the characters shown in the last section of the registration page, into the field provided.
Steps 08: Read the Terms of Service. Doesn't everybody? Thoroughly examine every page till the end or till your eyes glaze over, and then print a copy for your records.

Caution!
  • Choose a username that will identify you to your recipients and won't be mistaken for spam. Yahoo members often choose some variation of their birth names for their usernames.
  • You can create as many accounts as you like, and use them as described in the intro. Some email providers, such as Google or Apple's Mail will let you check all email accounts.
Good luck! - gmailuserguide.blogspot.com
Copyright © 2013 Gmail User Guide - Proudly powered by Blogger.